Building an envelope printing app with WPF, GDI+ and the Microsoft Store
The standard answer to “how do I print an address on an envelope” is Microsoft Word’s envelope wizard. I don’t have Word, and I wasn’t about to start paying for a Microsoft 365 subscription to put two addresses on a piece of paper a few times a month. The free alternatives I found were either web tools that want you to hand over an address list, or utilities with a fixed layout you can’t move.
So I wrote my own: Mailwright - Envelope Address Printer, a small .NET 8 WPF app that puts two draggable address blocks on a canvas shaped like a real envelope and prints exactly what you see. No Office subscription, and rather more control than the Word wizard offers — in Word the address boxes sit where Word decides, and font changes happen in a dialog you can’t see the result of. Here you drag each block to where you want it on a to-scale envelope, set the font family, size and color per block, and the canvas is the preview.
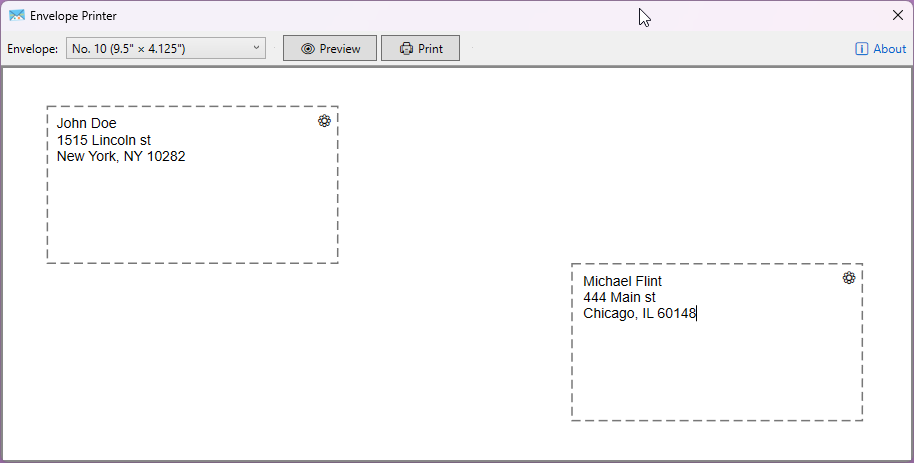
What it does, briefly:
- Recipient and return address blocks you drag around a live canvas — the canvas is the envelope, at scale
- Four envelope sizes: No. 10, C4, C5, DL
- Per-block font family, size and color (each block is configured independently)
- Optional sender logo image next to the return address
- Return address and the last 10 recipients persist between runs
- Print preview before committing an envelope to the printer
The rest of this post is about the parts that didn’t work the first time.
One project, two UI frameworks
The app is WPF, but WPF has no printer-selection dialog worth using and no print preview at all. System.Windows.Controls.PrintDialog gives you a printer picker but the actual page rendering means building a DocumentPaginator over WPF visuals, and there is no PrintPreviewDialog equivalent in the box. WinForms has both, plus System.Drawing.Printing.PrintDocument, which is a far more direct way to say “draw this string at this point on the page.”
So the .csproj enables both:
<UseWPF>true</UseWPF>
<UseWindowsForms>true</UseWindowsForms>
That compiles, and then every file in the project starts failing with CS0104: ambiguous reference. Both frameworks contribute implicit global usings, so Application, FontFamily, Point, UserControl, MouseEventArgs and Color all resolve to two different types at once.
The fix is a GlobalUsings.cs that picks a winner project-wide:
global using Application    = System.Windows.Application;
global using FontFamily     = System.Windows.Media.FontFamily;
global using MouseEventArgs = System.Windows.Input.MouseEventArgs;
global using Point          = System.Windows.Point;
global using UserControl    = System.Windows.Controls.UserControl;
WPF wins by default, and the one file that genuinely needs WinForms — the print service — reaches for it through a local alias instead:
using WinForms = System.Windows.Forms;

using var dlg = new WinForms.PrintDialog { Document = doc };
Color is the nastiest of the bunch, because System.Drawing stays an implicit global using for the whole project. Any file that also imports System.Windows.Media has to fully qualify it:
var color = (System.Windows.Media.Color)System.Windows.Media.ColorConverter.ConvertFromString(hex)!;
It looks ugly, but aliasing Color globally would have broken the GDI+ side. Fully qualifying in the three files that care was the smaller evil.
Two coordinate systems that must agree
The on-screen canvas is WPF, so it measures in device-independent pixels: 96 DIP to the inch. The printed page is GDI+ System.Drawing.Printing, which by default measures in hundredths of an inch. A No. 10 envelope is 9.5″ × 4.125″, which is 912 × 396 DIP on screen and 950 × 412 on paper.
The temptation is to store block positions in one unit and convert. That falls apart the moment the user switches envelope size — a block sitting at “x = 400 pixels” is in a sensible place on a C4 and hanging off the edge of a DL.
Positions are therefore stored as fractions of the envelope, 0 to 1, and each renderer multiplies by its own page dimensions. Dropping a block on the canvas converts pixels down to a fraction:
[RelayCommand]
private void ToDragCompleted(Point p)
{
    PrintSettings.ToLeftFraction = CanvasWidth  > 0 ? p.X / CanvasWidth  : AppConstants.AddressBlockPositions.ToLeftFraction;
    PrintSettings.ToTopFraction  = CanvasHeight > 0 ? p.Y / CanvasHeight : AppConstants.AddressBlockPositions.ToTopFraction;
    _addressService.SavePrintSettings(PrintSettings);
}
and the print path multiplies the same fraction back up against GDI+ units, never touching DIPs at all:
float pageW = (float)AppConstants.InchesToGdiUnits(widthIn);   // hundredths of an inch
float pageH = (float)AppConstants.InchesToGdiUnits(heightIn);

DrawAddress(g, recipientText, toFont, toBrush,
    pageW * (float)settings.ToLeftFraction,
    pageH * (float)settings.ToTopFraction,
    pageW * (float)AppConstants.AddressBlockDimensions.ToPrintBlockWidthFraction,
    pageH * (float)AppConstants.AddressBlockDimensions.ToPrintBlockHeightFraction);
Both conversions live in a single AppConstants class, which is the only place 96.0 and 100 appear. Envelope switching then costs nothing: recompute the canvas size, re-multiply the fractions, done.
One thing that is deliberately not a fraction: font size. Points are absolute, so 14pt on screen and 14pt on paper are the same physical height, and the preview stays honest.
Getting the printer to admit it knows what an envelope is
This was the longest detour. PrintDocument lets you set DefaultPageSettings.PaperSize to a custom PaperSize with any dimensions you like, and that mostly works — the page comes out the right size. What it does not do is tell the printer driver “this is an envelope,” so the driver keeps its letter-tray settings, reports a PrintableArea for letter paper, and some drivers helpfully scale or reject the job.
The right move is to ask the driver for its own PaperSize entry matching the correct PaperKind. That has two wrinkles.
First, System.Drawing.Printing.PaperKind only has a named member for Number10Envelope. C4, C5 and DL exist in the underlying Win32 DMPAPER_* constants but not as friendly enum names, so they get cast in by value:
public static PaperKind GetPaperKind(EnvelopeSize size) =>
    size switch
    {
        EnvelopeSize.No10 => PaperKind.Number10Envelope, // DMPAPER_ENV_10 = 20
        EnvelopeSize.C4   => (PaperKind)30,              // DMPAPER_ENV_C4 = 30
        EnvelopeSize.C5   => (PaperKind)28,              // DMPAPER_ENV_C5 = 28
        EnvelopeSize.DL   => (PaperKind)27,              // DMPAPER_ENV_DL = 27
        _                 => PaperKind.Number10Envelope
    };
Second, you can’t resolve the paper size when you build the document, because at that point the user hasn’t picked a printer yet. PrintDocument raises QueryPageSettings immediately before each page, with the actual selected printer’s settings attached — that’s the hook:
doc.QueryPageSettings += (_, qe) =>
{
    var nativeSize = qe.PageSettings.PrinterSettings
        .PaperSizes
        .Cast<PaperSize>()
        .FirstOrDefault(ps => ps.Kind == paperKind)
        ?? customSize;

    qe.PageSettings.PaperSize = nativeSize;
    qe.PageSettings.Landscape = true;
    qe.PageSettings.Margins   = new Margins(0, 0, 0, 0);
};
If the driver doesn’t list that kind — plenty of PDF writers don’t — it falls back to a custom PaperSize built from the known dimensions. Note that the custom size is constructed with height and width swapped relative to the layout values, because PaperSize describes the sheet in portrait and Landscape = true rotates it.
The last piece is a decision not to use what the driver reports. PrintPage lays out against the nominal envelope dimensions, not e.Graphics.VisibleClipBounds or PageSettings.PrintableArea. Printable area varies by driver and by hardware margins, and honoring it means the same envelope prints differently on two printers — while the on-screen preview shows only one of them. Laying out against the true physical envelope keeps WYSIWYG intact; the cost is that an address dragged into the outer few millimeters may clip on a printer with large hardware margins.
The preview dialog has a Print button, and it doesn’t tell you
The app has a five-print free trial, and the counter increments after a successful print. PrintPreviewDialog quietly broke that: its toolbar includes a printer icon that calls PrintDocument.Print() directly. No event, no return value, no notification to the calling code. Free unlimited printing, one click away.
There is no property to hide it, so the toolbar gets walked and the button is switched off by name:
foreach (Control control in dlg.Controls)
{
    if (control is ToolStrip toolStrip)
    {
        foreach (ToolStripItem item in toolStrip.Items)
        {
            if (item.Name == "printToolStripButton")
            {
                item.Visible = false;
                break;
            }

            // Fallback check if the name differs in some .NET versions
            if (item.ToolTipText == "Print")
            {
                item.Visible = false;
                break;
            }
        }
    }
}
Reaching into another control’s private layout by string is exactly as fragile as it looks, hence the tooltip fallback. The result is the preview window below — zoom and page-layout buttons, no printer icon.
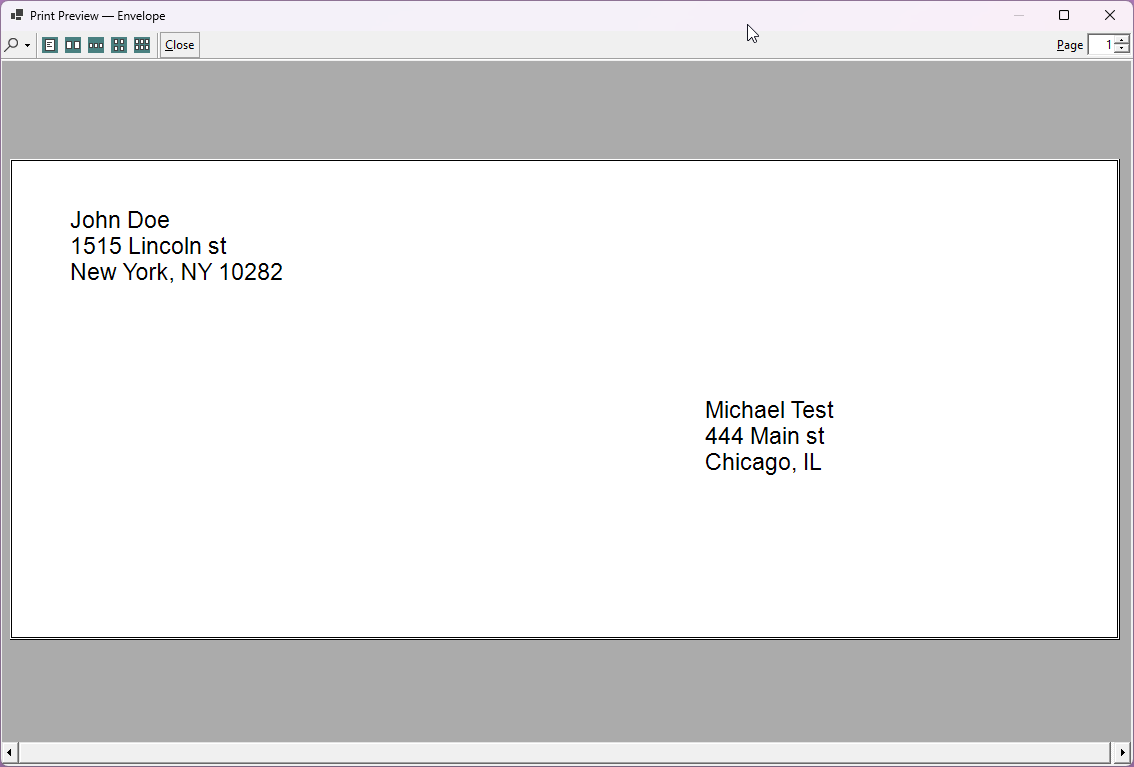
The same bug had a mirror image on the real print path. IPrintService.Print originally returned void, so cancelling the printer dialog still burned a trial print. It now returns whether the dialog was accepted:
bool isPrinted = _printService.Print(ToText, FromText, PrintSettings);

if (!isUnlocked && isPrinted)
{
    _licensingService.IncrementPrintCount();
    await UpdateLicensingStatusAsync();
}
Parenting a WinForms dialog to a WPF window
WinForms.PrintDialog.ShowDialog() with no argument shows an unowned dialog: it can end up behind the main window, and Alt+Tab treats it as a separate top-level thing. It wants an IWin32Window, which WPF windows are not. You get the HWND from WindowInteropHelper and wrap it in four lines:
private static WinForms.IWin32Window? GetOwnerHandle()
{
    var mainWindow = Application.Current?.MainWindow;
    if (mainWindow is null) return null;
    var handle = new WindowInteropHelper(mainWindow).Handle;
    return handle == IntPtr.Zero ? null : new NativeWindow(handle);
}

private sealed class NativeWindow(IntPtr handle) : WinForms.IWin32Window
{
    public IntPtr Handle { get; } = handle;
}
The handle == IntPtr.Zero check matters — the HWND doesn’t exist until the window is sourced, so calling this too early in startup silently gives you an unowned dialog again.
Store add-on licensing: the key isn’t the key
The full version is a durable in-app purchase, checked through Windows.Services.Store. Two things bit me here.
StoreContext is a WinRT API designed for UWP, where there’s an implicit window. On Win32 it has no idea which window to attach its purchase UI to, and calls fail or hang until you tell it:
var storeContext = StoreContext.GetDefault();
var hwnd = new WindowInteropHelper(Application.Current.MainWindow).Handle;
InitializeWithWindow.Initialize(storeContext, hwnd);
Which means the license check cannot run during OnStartup before the window exists. It’s kicked off after Show() instead:
MainWindow = mainWindow;
mainWindow.Show();

// Must run after MainWindow is assigned so the Store license check
// can associate with a window handle.
_ = mainViewModel.InitializeLicensingStatusAsync();
The second one only shows up once someone has actually bought the add-on. StoreAppLicense.AddOnLicenses is a dictionary, and the obvious code is:
license.AddOnLicenses.TryGetValue(FullVersionStoreId, out var addOnLicense)
That never matches. The dictionary is keyed by <StoreId>/<Sku> — "9MTPB8D2TFGH/0010", not "9MTPB8D2TFGH". So a paid-up license reads as “not purchased” and the app keeps showing the trial limit, with no error from the API anywhere — just an absent key. Matching on the prefix fixes it:
private static StoreLicense? FindFullVersionLicense(StoreAppLicense license)
{
    foreach (var kvp in license.AddOnLicenses)
    {
        if (kvp.Key == FullVersionStoreId || kvp.Key.StartsWith(FullVersionStoreId + "/", StringComparison.Ordinal))
        {
            return kvp.Value;
        }
    }

    return null;
}
Debugging this is awkward because Store APIs only work when the app is packaged and installed, which is not how you run it under F5. Detecting that is itself an exception-driven check — Windows.ApplicationModel.Package.Current throws InvalidOperationException when unpackaged rather than returning null:
private static bool IsPackaged()
{
    try
    {
        return Windows.ApplicationModel.Package.Current != null && Windows.ApplicationModel.Package.Current.Id != null;
    }
    catch (InvalidOperationException)
    {
        return false;
    }
}
Unpackaged runs fall back to a local flag in the database so the UI is still testable. That’s a development bypass, not an entitlement check, and it’s worth being clear-eyed about which one you’ve written.
MSIX signing: the certificate subject is not a label
The CI build produces a signed MSIX. My first attempt created a self-signed certificate with a friendly-looking subject:
New-SelfSignedCertificate -Type CodeSigningCert -Subject "CN=Karpach.EnvelopPrinter" ...
signtool was happy. Installation failed with 0x8007000B. The certificate subject must match the Publisher attribute in AppxManifest.xml character for character — and once you reserve a name in Partner Center, that value becomes CN=6884325E-1F8A-4326-8D57-2AFC390B7FD6, not anything human-readable. The build now reads the publisher out of the manifest instead of hardcoding it:
[xml]$manifest = Get-Content "msix-publish\AppxManifest.xml"
$publisher = $manifest.Package.Identity.Publisher

$cert = New-SelfSignedCertificate -Type CodeSigningCert -Subject $publisher `
  -FriendlyName "Envelope Printer Test Certificate" `
  -TextExtension @("2.5.29.37={text}1.3.6.1.5.5.7.3.3") `
  -NotAfter (Get-Date).AddYears(5)
It also deletes any cached .pfx first, so a manifest change can’t leave a stale certificate signing packages with the wrong subject.
Versioning had a related snag. Locally the version comes from git tags via MinVer, which produces things like 1.1.3-alpha.0.5 on untagged commits. The Store requires strictly Major.Minor.Build.0 with a fourth part of zero. CI therefore skips MinVer entirely and derives the version from the run number, which is monotonic by construction:
- name: Build solution
  run: dotnet build --configuration Release --no-restore /p:MinVerSkip=true /p:Version=${{ env.DISPLAY_VERSION }} /p:FileVersion=${{ env.MSIX_VERSION }} /p:AssemblyVersion=${{ env.MSIX_VERSION }}
with DISPLAY_VERSION = 1.1.<run_number> and MSIX_VERSION = 1.1.<run_number>.0.
Schema changes without EF migrations
Settings live in SQLite at %AppData%\Karpach.EnvelopPrinter\app.db via EF Core 8. The first release shipped with Database.EnsureCreated(), which is convenient and a dead end: it creates the schema once and then never touches it again. Every column added since — the trial counter, the font colors, the logo position — would simply be missing on an existing user’s database, and EnsureCreated() reports no problem at all. You find out when a query fails.
Since users' addresses live in that file, dropping and recreating it wasn’t acceptable. EnsureDatabase() now probes for each column and adds it if absent:
try
{
    using var cmd = conn.CreateCommand();
    cmd.CommandText = "SELECT FromFontColor FROM PrintSettings LIMIT 1";
    cmd.ExecuteNonQuery();
}
catch
{
    using var cmd = conn.CreateCommand();
    cmd.CommandText = "ALTER TABLE PrintSettings ADD COLUMN FromFontColor TEXT NOT NULL DEFAULT '#000000'";
    cmd.ExecuteNonQuery();
}
Exception-driven, repeated per column, and honestly it should have been proper EF migrations from day one. It ends with a single SELECT naming every expected column; if that throws, the schema has drifted beyond repair and the file gets deleted and rebuilt.
Deleting it has its own trap. Microsoft.Data.Sqlite pools connections, so the file handle outlives the DbContext and File.Delete fails with a sharing violation:
SqliteConnection.ClearAllPools();
if (File.Exists(dbPath))
    File.Delete(dbPath);
Small things that turned out to matter
Drag versus click on the same control. The address blocks are both draggable and click-to-edit. Treating MouseLeftButtonUp as a click means a 2-pixel wobble while dragging drops you into edit mode. A 4-pixel threshold separates the two intents:
if (!_isDragging && (Math.Abs(dx) > DragThreshold || Math.Abs(dy) > DragThreshold))
    _isDragging = true;
On mouse-up, _isDragging decides whether to persist a position or focus the text box.
The color palette is free. Rather than build a color picker, the dropdown reflects over System.Windows.Media.Colors and turns each named static property into a swatch with a #RRGGBB string. The hex string is what gets stored, which is also what GDI+ accepts via ColorTranslator.FromHtml — one representation, both renderers.
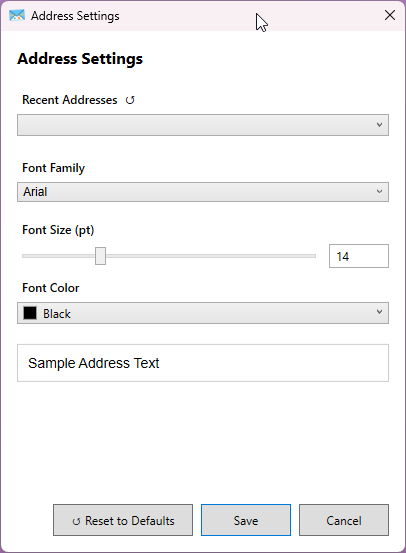
Logos get re-encoded on import. The user picks any image; it’s decoded, capped at 1000px on the long edge using BitmapImage.DecodePixelWidth (which downsamples during decode rather than after), and re-saved as PNG. Otherwise a 12MP phone photo ends up permanently in AppData for a box that renders at under an inch.
Wrapping up
Roughly speaking: the WPF/WinForms interop and the coordinate math were tedious but predictable, while the genuinely expensive bugs — the preview dialog’s hidden print button, the AddOnLicenses key format, the certificate subject mismatch — were all cases where an API failed silently and did something plausible instead of complaining. Printing and Store licensing are both areas where “it returned without throwing” means very little.
The app is on the Microsoft Store: five free prints to try it, then a one-time add-on unlocks unlimited printing. No subscription, and no Office required.